Tuesday, May 31, 2011

Java hibernate with mssql, posible mysql, oracle and anymore


Дээрхи зургийг татаж аваад үзээрэй.
Тэгээд дурайж хийхдээ:
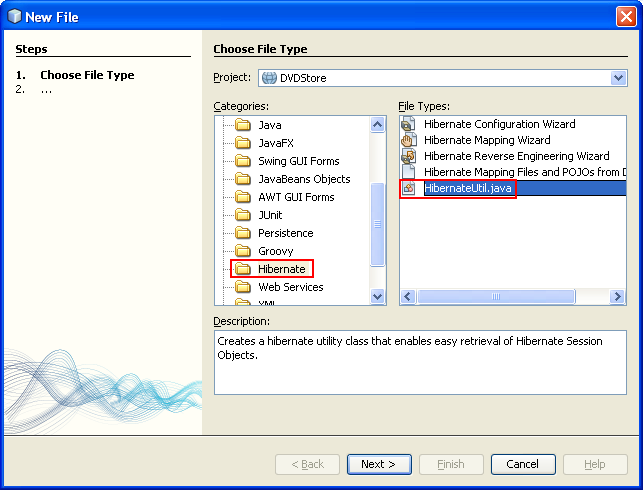
1. add new NewHibernateUtil.java from hibernate category
2. add new Hibernate.cfg.xml from hibernate category

<property name="hibernate.connection.driver_class">com.microsoft.sqlserver.jdbc.SQLServerDriver</property>
    <property name="hibernate.connection.url">jdbc:sqlserver://homework:1433;databaseName=MotelDb</property>
    <property name="hibernate.connection.username">sa</property>
    <property name="hibernate.connection.password"></property>

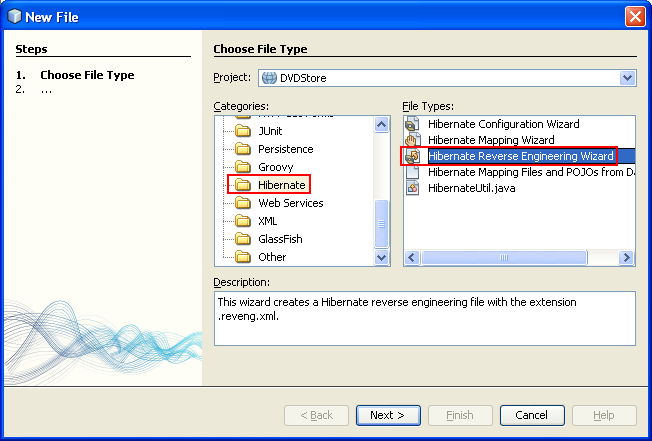
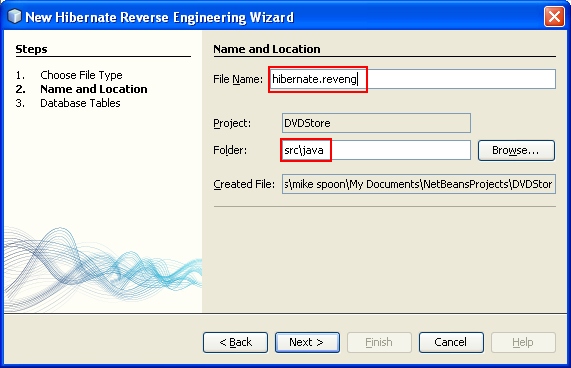
3. add new hibernate.reveng.xml from hibernate category

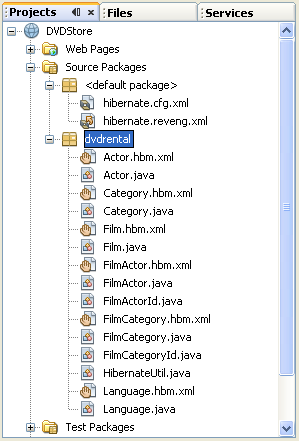
generate entity class with *.hbm.xml files

4. Session sess = NewHibernateUtil.getSessionFactory().openSession();
        Transaction tran = sess.beginTransaction();
       
        Role role = new Role();
        role.setName("clienta");
        role.setDescription(null);
        role.setIsActive(true);
        role.setCreated(new Date());
        role.setModified(new Date());
        role.setUserName("root");
       
        sess.saveOrUpdate(role);
       
        tran.commit();
        sess.close();

аан энэ бүхнээс эхэнд hibernate library add хийхээ мартваа тэгэхгүй бол import aldaa zaana

Wednesday, May 25, 2011

Java sql connections

Driver
Version
Example URL
JavaDB Derby 10.3.1.4 jdbc:derby://localhost:1527/sample (Network)
Oracle Oracle Database 11g (11.1.0.7) jdbc:oracle:thin:@//localhost:1521:ora11i
Other Drivers The following drivers and databases have not been formally tested, but should work based on experience.
Driver
Version
Example URL
PostgreSQL 8.x jdbc:postgresql://jsmith.mycompany.com:5432/postgres
MySQL MySQL Connector/J 6.0 jdbc:mysql://localhost:3306/sample
Microsoft Microsoft SQL Server 2005 JDBC Driver 1.2.2828.100 jdbc:sqlserver://localhost:1433;databaseName=travel;selectMethod=cursor
IBM Redistributable DB2 JDBC Type 4 driver v8 fixpack 13 jdbc:db2://localhost:50002/sample
jTDS jTDS 1.2.1 jdbc:jtds:sqlserver://test-mycompany.com:1433/travel
DataDirect DataDirect Connect for JDBC - 3.6 DataDirect Connect for JDBC - 3.6.07 jdbc:datadirect:oracle://localhost;SID=ora11i jdbc:datadirect:sqlserver://localhost:1433;DatabaseName=travel;SelectMethod=cursor jdbc:datadirect:db2://localhost:50002;databaseName=sample

Wednesday, May 11, 2011

Using Hibernate in a Web Application 3

Using Hibernate in a Web Application 3

(With NetBeans & MySQL)


Creating the HibernateUtil.java Helper File

To use Hibernate you need to create a helper class that handles startup and that accesses Hibernate's SessionFactory to obtain a Session object. The class calls configure() and loads the hibernate.cfg.xml configuration file and then builds the SessionFactory to obtain the Session object. In this section you use the New File wizard to create the helper class HibernateUtil.java.

  1. Right-click the Source Packages node and select New > Other to open the New File wizard.
 
Adding Java package into Hibernate web application project

  1. Select Hibernate from the Categories list and HibernateUtil.java from the File Types list. Click Next.

Adding the hibernateUtil.java file into the Hibernate Java web application project

  1. Type HibernateUtil for the class name and dvdrental for the package. Click Finish.
 
Do some settings on the HibernateUtil.java

When you click Finish, HibernateUtil.java opens in the editor. You can close the file because you do not need to edit the file.

Generating Hibernate Mapping Files and Java Classes

In this tutorial you use a POJO (plain old Java object) to represent the data in each of the tables in the database that you will use. The Java class specifies the fields for the columns in the tables and uses simple setters and getters to retrieve and write the data. To map the POJOs to the tables you can use a Hibernate mapping file or use annotations in the class.
You can use the Hibernate Mapping Files and POJOs from a Database wizard to create multiple POJOs and mapping files based on database tables. When you use the wizard you select all the tables for which you want POJOs and mapping files and the IDE then generates the files for you based on the database tables and adds the mapping entries to hibernate.cfg.xml. When you use the wizard you can choose the files that you want the IDE to generate (only the POJOs, for example) and select code generation options (generate code that uses EJB 3 annotations, for example).
Note. The IDE also has wizards to help you create individual POJOs and mapping files from scratch.

Creating the Hibernate Reverse Engineering File

If you want to use the Hibernate Mapping Files and POJOs from a Database wizard, you first need to create a hibernate.reveng.xml reverse engineering file. The Hibernate Mapping Files and POJOs from a Database wizard requires hibernate.reveng.xml and hibernate.cfg.xml.
The reverse engineering file enables you to have greater control over how database mapping strategy. The Hibernate Reverse Engineering Wizard creates a reverse engineering file with a default configuration that you can edit in the XML editor.
To create the Hibernate reverse engineering file, perform the following steps.

  1. Right-click the Source Packages node in the Projects window and choose New > Other to open the New File wizard.

  1. Select Hibernate Reverse Engineering Wizard in the Hibernate category. Click Next.
 
Adding another file - Hibernate Reverse Engineering Wizard

  1. Specify hibernate.reveng as the File Name and src\java for the Folder (both are default). Click Next.

Setting the name and location for the Hibernate Reverse Engineering Wizard

  1. Select hibernate.cfg.xml from the Configuration File drop down list, if not selected.
  2. Select the following tables from Available Tables and click Add to add the tables to Selected Tables.
  1. actor
  2. category
  3. film
  4. film_actor
  5. film_category
  6. language


------------------------------------------------------------------

Selecting the database tables into the Hibernate Reverse Engineering Wizard

Click Finish.
 
The wizard generates a hibernate.reveng.xml reverse engineering file and opens the file in the editor. You can close the reverse engineering file because you will not need to edit the file.

Creating the Hibernate Mapping Files and POJOs

You can use the Hibernate Mapping Files and POJOs from a Database wizard to generate files for you. The wizard can generate a POJO and a corresponding mapping file for each table that you select in the wizard. The mapping files are XML files that contain data about how the columns in the tables are mapped to the fields in the POJOs. You need to have the hibernate.reveng.xml and hibernate.cfg.xml files to use the wizard.
To create the POJOS and mapping files using a wizard, perform the following steps.

  1. Right-click the Source Packages node in the Projects window and choose New > Other to open the New File wizard.
  2. Select Hibernate Mapping Files and POJOs from a Database in the Hibernate category. Click Next.

Adding more Hibernate files - Hibernate Mapping Files and POJOs from Database

  1. Ensure that the hibernate.cfg.xml and hibernate.reveng.xml files are selected in the drop down lists.
  2. Select JDK 5 Language Features under the General Settings options.
  3. Ensure that the Domain Code and Hibernate XML Mappings options are selected.
  4. Select dvdrental for the Package name. Click Finish.

Doing some settings on the Hibernate Mapping Files and POJOs from Database

When you click Finish the IDE generates POJOs and Hibernate mapping files with the fields mapped to the columns specified in hibernate.reveng.xml. The IDE also adds mapping entries to hibernate.cfg.xml. You can expand the dvdrental package to see the files generated by the wizard.

The dvdrental package with the files generated by the wizard

You can use the Hibernate Mapping wizard if you want to create a Hibernate mapping file that maps a specific table to a specific class.

Friday, May 6, 2011

MySQL create table script and Create procedure simple

CREATE TABLE IF NOT EXISTS `category` (
  `id` int(10) unsigned NOT NULL AUTO_INCREMENT,
  `parentid` int(11) NOT NULL,
  `typecode` int(11) NOT NULL,
  `siteid` int(11) NOT NULL,
  `sectionid` int(11) NOT NULL,
  `name` varchar(100) CHARACTER SET utf8 COLLATE utf8_unicode_ci NOT NULL,
  `description` varchar(500) CHARACTER SET utf8 COLLATE utf8_unicode_ci NOT NULL,
  `template` text CHARACTER SET utf8 COLLATE utf8_unicode_ci NOT NULL,
  `photoid` int(11) NOT NULL,
  `ordering` int(11) NOT NULL,
  `capacity` int(11) NOT NULL,
  `isactive` tinyint(4) NOT NULL,
  PRIMARY KEY (`id`)
) ENGINE=InnoDB DEFAULT CHARSET=latin1 AUTO_INCREMENT=1 ;


'delimiter ..' энэ команд нь үйлдэл гүйцэтгэх тусгаарлах тэмдэгт болох ';' -г '..' тэмдэгтээр солидог. mysql програмд нэвтрэн орж шууд бичин хэрэглэнэ. Араас нь доор байгаа кодыг ажиллуулах боломжтой болно.

drop procedure if exists addcolumnx6..
create procedure addcolumnx6(in tablename varchar(30))
begin
set @sql=CONCAT("alter table ",tablename," ");
set @sql=CONCAT(@sql," add column created datetime not null, ");
set @sql=CONCAT(@sql," add column createdid int(10) unsigned null, ");
set @sql=CONCAT(@sql," add column createdname varchar(30) CHARACTER SET utf8 COLLATE utf8_unicode_ci NULL, ");
set @sql=CONCAT(@sql," add column modified datetime not null, ");
set @sql=CONCAT(@sql," add column modifiedid int(10) unsigned null, ");
set @sql=CONCAT(@sql," add column modifiedname varchar(30) CHARACTER SET utf8 COLLATE utf8_unicode_ci NULL; ");
PREPARE stm from @sql;
EXECUTE stm;
DEALLOCATE PREPARE stm;
end..

Бичсэн програмаа ажиллуулахдаа:
call AddColumnX6('category');